Question: what important things do photographers and cinematographers know about lighting?
Question: why does BasicEffect support exactly three lights?
Answer: the standard lighting rig!
Many years ago photographers discovered that a single light was not enough to make their subjects look good. Instead, they use three.
The key light is the brightest, and provides the main illumination and shadows. This will typically be positioned to match a real light source such as an overhead lamp, a window, or the sun for an outdoor scene.
The fill light is dimmer, and usually angled at 90 degrees to the key. This is used to soften the shadows, adding shading and definition to areas that would otherwise be solid black.
Finally, the back light is positioned behind the character, facing toward the camera. This illuminates only the silhouette edges, helping the character stand out against the background.
Pretty much every movie ever made and every fashion shot ever photographed have depended on this lighting rig. There are many variations:
But the underlying principle is always the same. Things simply look better when lit this way.
In the XNA Framework, the BasicEffect.EnableDefaultLighting method sets up this standard lighting rig for you.
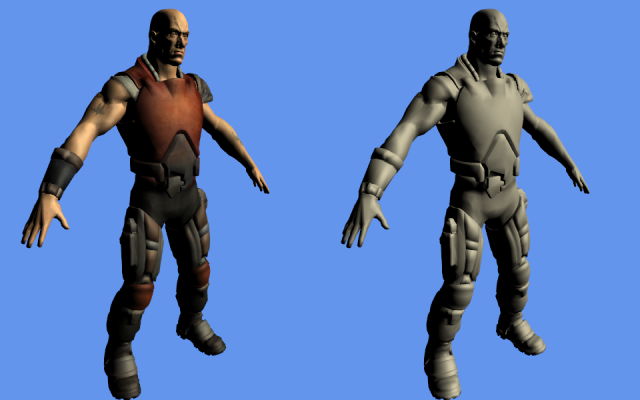
Here is a character illuminated by only the key light, shown with textures on the left and untextured on the right. Note how the shadowed areas are excessively dark and lacking in definition:
Next, here is the fill light. Note how this illuminates exactly the same areas that were most shadowed by the key:
Finally, here is the back light shown in isolation. Subtle, but important!
Putting all three lights together, here is the character using BasicEffect.EnableDefaultLighting. Note how detailed he looks compared to using only the key light, and how everything is well illuminated while still giving a good impression of shape and depth:
For a real game you will probably want to control the lighting yourself rather than just relying on these defaults. You might want to adjust the key to match a light source object in your game world, or to move the back light so it matches your camera position, or to tweak the light colors and intensities.
Don't get too hung up on being 100% realistic. The fill and back lights in particular are intended to make your model look good: it doesn't matter whether they correspond to a real light source in the game world, or even if they're coming from a direction where it would be physically impossible to have a light source. Cinematographers position these lights wherever they like with little regard for realism, and if it works for movies, most likely it will look good in games as well!
If you are rendering realtime shadows, you will typically only want to cast them from the key light. Trying to shadow the fill and back lights isn't usually worth the processing power, and will often just muddy the image (cinematographers sometimes even use soft area lights specifically to get rid of these secondary shadows).
Although this lighting rig was designed for characters, it works well for any kind of 3D entity. It isn't really suitable for backgrounds or landscapes, though: those are a whole different kettle of fish.