For the ultimate in crazy transition effects, render-to-texture is your friend.
Setting this up is pretty easy. First you need to add a custom rendertarget field to the top of your Game class:
public RenderTarget2D renderTarget;Second, initialize this rendertarget in LoadGraphicsContent:
    PresentationParameters pp = graphics.GraphicsDevice.PresentationParameters;

    renderTarget = new RenderTarget2D(graphics.GraphicsDevice,
                                      pp.BackBufferWidth, pp.BackBufferHeight,
                                      1, SurfaceFormat.Color);
At the very start of your Draw method, draw the screen you are transitioning toward onto the rendertarget:
    graphics.GraphicsDevice.SetRenderTarget(0, renderTarget);
    graphics.GraphicsDevice.Clear();

    // Draw the second screen (the one you are transitioning toward)

    graphics.GraphicsDevice.ResolveRenderTarget(0);
    graphics.GraphicsDevice.SetRenderTarget(0, null);
Next, draw the screen that you are transitioning away from directly to the main backbuffer.
Why draw the second screen before the first? This is because of how rendertargets work in XNA. On Xbox, the resolve call will erase the contents of the backbuffer, destroying anything that was previously drawn there. If we want to send some things to a rendertarget and others to the backbuffer, we must do all our rendertarget drawing first, and only start drawing to the backbuffer after we have resolved the rendertarget.
Once we have finished drawing both screens, one to the backbuffer and the other to our rendertarget, we can draw the contents of the rendertarget over the backbuffer, changing the alpha to implement a cross-fade transition:
    spriteBatch.Begin();
    spriteBatch.Draw(renderTarget.GetTexture(), Vector2.Zero, Color(255, 255, 255, TransitionAlpha));
    spriteBatch.End();
Simple, huh? But once you have your screen in a rendertarget, you can do far more than just fading it in and out. You could change the spriteBatch.Draw call to tint the color of the screen, or scale it, or rotate so it will spin into place. You could use several calls to display the rendertarget texture in smaller pieces, making each section slide into position from a different direction. You could map the rendertarget texture onto a grid of 3D polygons, then animate those so they shatter and spin off in different directions, or fold up like turning the page of a book.
The most interesting effects of all use a custom pixel shader when drawing the rendertarget over the backbuffer. For instance this effect implements a data-driven swipe transition, using a texture to control the swipe pattern. It works by encoding time values into a texture. White pixels will change to display the new screen early on in the transition, while black ones only change later on. The current transition position is set as an effect parameter, and the shader compares that position with the value from the control texture to decide which pixels should be drawn:
   sampler SceneSampler : register(s0);
   sampler TransitionSampler : register(s1);

   float4 main(float4 color : COLOR0, float2 texCoord : TEXCOORD0) : COLOR0
   {
      float4 scene = tex2D(SceneSampler, texCoord);
      float transitionMask = tex2D(TransitionSampler, texCoord).r;

      scene.a = (TransitionPosition < transitionMask) ? 1 : 0;

      return scene;
   }

   technique T
   {
      pass P
      {
         PixelShader = compile ps_2_0 main();
      }
   }
To use this shader, change the SpriteBatch code which displays your rendertarget to:
    spriteBatch.Begin(SpriteBlendMode.AlphaBlend, SpriteSortMode.Immediate, SaveStateMode.None);

    graphics.GraphicsDevice.Textures[1] = TransitionControlTexture;

    transitionEffect.Parameters["TransitionPosition"].SetValue(TransitionPosition);

    transitionEffect.Begin();
    transitionEffect.CurrentTechnique.Passes[0].Begin();

    spriteBatch.Draw(renderTarget.GetTexture(), Vector2.Zero, Color.White);

    spriteBatch.End();

    transitionEffect.CurrentTechnique.Passes[0].End();
    transitionEffect.End();
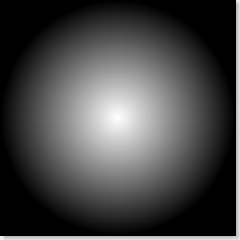
For starters, try something like this as your transition control texture:
That will create a circular swipe transition similar to the stencil technique I described in my previous post. But with this shader based implementation, it is incredibly easy to achieve different effects simply by changing your control texture. Try this for a crazy organic swipe pattern:
Or this one to have the new screen appear first along the diagonal white lines, and then gradually fill in the spaces between each bar:
Another interesting transition shader uses a control texture to offset the location of each pixel, making the screen image warp or distort as the transition progresses. This shader uses the red channel of the control texture to offset pixels from left to right, and the green channel to control vertical movement:
   sampler SceneSampler : register(s0);
   sampler TransitionSampler : register(s1);

   float4 main(float4 color : COLOR0, float2 texCoord : TEXCOORD0) : COLOR0
   {
      float2 transitionOffset = tex2D(TransitionSampler, texCoord).xy - 0.5;

      transitionOffset *= TransitionPosition * 0.25;

      float4 scene = tex2D(SceneSampler, texCoord + transitionOffset);

      scene.a = (1 - TransitionPosition);

      return scene;
   }

   technique T
   {
      pass P
      {
         PixelShader = compile ps_2_0 main();
      }
   }
This control texture will produce a chaotic warping effect:
This one basically skews the image along the diagonal, but also includes some high frequency noise that will create a subtle ripple over the top:
The great thing about using textures to control shader transitions is that once you have the code in place, you can try out many different effects just by changing the texture. All the crazy warping, rippling, and shimmering transitions you can possibly imagine, available at the touch of a Photoshop filter!
For some true psychedelia, try animating or rotating the control texture as the transition progresses...