    // Make the menu slide into place during transitions, using a
    // power curve to make things look more interesting (this makes
    // the movement slow down as it nears the end).
    float transitionOffset = (float)Math.Pow(TransitionPosition, 2);

    if (ScreenState == ScreenState.TransitionOn)
        position.X -= transitionOffset * 256;
    else
        position.X += transitionOffset * 512;
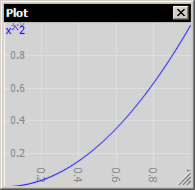
This is altering the raw TransitionPosition value by raising it to the power of 2, producing this movement curve:
In other words, it makes the animation move quickly at first, but slow down toward the end.
Try altering this to remove the power curve. Change the line with the Pow instruction to:
float transitionOffset = TransitionPosition;Now go back and forth between the main menu and options screen a few times. See how horrible and clunky that is? The eye is very sensitive not only to the speed at which things are moving, but also to how that speed changes over time. It looks incredibly boring if everything just moves at a constant speed the whole way through the transition.
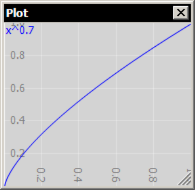
Going the other way, we could use a negative power curve to make things start out slowly and then speed up at the very end of the transition:
float transitionOffset = (float)Math.Pow(TransitionPosition, 0.7);
This produces the following curve:
I don't like that effect too much in the sample, but it could work well if accompanied by a dramatic sound effect plus maybe shaking the background image.
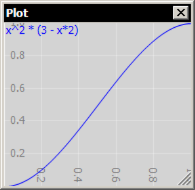
A particularly useful curve for transitions is the smoothstep or sigmoid. This starts out slow, speeds up in the middle, and then slows down again at the end:
This is such a common curve that we built it directly into the XNA MathHelper class, and if you are writing shaders, HLSL has an intrinsic function for it, too. Try this out:
float transitionOffset = MathHelper.SmoothStep(0, 1, TransitionPosition);If you have several objects that are transitioning at the same time, it can be interesting to stagger their animations so they move one after another rather than exactly in sync.
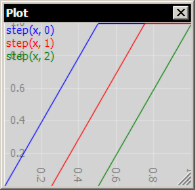
If you have numEntries different objects involved in a transition, and you want to stagger them so their animations have some small overlap amount (somewhere around 0.5 is good for this), use this formula to compute the transition position for object number n:
step(x, n) = clamp((x - (1 - overlap) * n / (numEntries - 1)) / overlap, 0, 1)
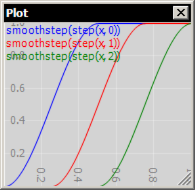
That equation is a little daunting, so maybe plotting it will help. Here is the result of the step curve evaluated for a transition with three objects using overlap = 0.5:
The really cool thing about applying curves to normalized control values is that you can easily combine them. If we wanted to stagger the animation of several objects, but also wanted to apply a smoothstep effect, we can just call smoothstep on the result of the step function:
Let's try this in code. Delete this entire section of MenuScreen.cs:
    // Make the menu slide into place during transitions, using a
    // power curve to make things look more interesting (this makes
    // the movement slow down as it nears the end).
    float transitionOffset = (float)Math.Pow(TransitionPosition, 2);

    if (ScreenState == ScreenState.TransitionOn)
        position.X -= transitionOffset * 256;
    else
        position.X += transitionOffset * 512;
Further down in the function, find this line:
    // Modify the alpha to fade text out during transitions.
    color = new Color(color.R, color.G, color.B, TransitionAlpha);
And replace it with:
    const float overlap = 0.5f;
    int numEntries = menuEntries.Count;

    float transitionOffset = MathHelper.Clamp((TransitionPosition - (1 - overlap) * i / numEntries) / overlap, 0, 1);

    position.X = MathHelper.SmoothStep(100, -200, transitionOffset);
    scale += MathHelper.SmoothStep(0, 4, transitionOffset);
    color = new Color(color.R, color.G, color.B, (byte)((1 - transitionOffset) * 255));
This staggers the transition from one menu entry to the next, and uses smoothstep curves to animate the size as well as the position and alpha of the text.
For some different effects, try changing the overlap value to 0.3 or 0.7.
