People, like cats and magpies, are instinctively fascinated by shiny things. In reality specular light and environment reflections are usually quite subtle, but car showrooms and jewelry stores are full of spotlights for a good reason! Salespeople long ago figured out that, while a diamond ring illuminated by sunlight may be pretty, that same ring glinting with a thousand highlights makes people go "ooh, shiny; now where did I put my checkbook?"
At a place I used to work, we joked that we should tweak our specular lighting as high as possible whenever the publisher was coming to visit. That way he would say "ooh, shiny!", and would happily sign off on the next milestone payment. Then we could revert to more realistic settings after he left :-)
Fortunately, the EnvironmentMapEffect class in XNA Game Studio 4.0 provides enough adjustable knobs that you can make your own choice between subtle, realistic, over the top, or just plain silly.
There are three ways you can apply EnvironmentMapEffect to a model:
There are also three main ways to create reflection cubemaps:
To see this in action, run the Reach Graphics Demo, select the "environment map effect" demo, and drag the sliders left or right to change settings. With all three sliders at zero, we get just the base texture with no environment map or specular at all:
Boring!
This demo uses a photo (from my vacation in Oregon last year) as the reflection source:
CubemapProcessor warps the photo to create this cubemap texture:
If we turn the EnvironmentMapAmount property all the way up to 1, we get just the reflection cubemap with none of the base texture:
That's great if you want to render a mirror (or a T-1000), but we usually want to see both the base texture and reflection. With EnvironmentMapAmount set to 0.5, we get a 50/50 blend between the two:
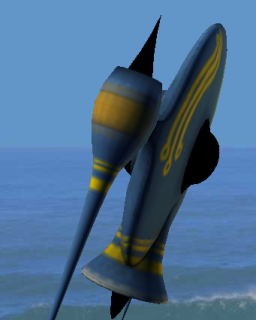
This type of blending is good for some things, but can lead to a washed out look that isn't always desirable. In real life, many surfaces exhibit what is called Fresnel reflectivity, which means they are not at all shiny when viewed straight on, but become increasingly reflective when viewed at an angle. To try this, turn EnvironmentMapAmount all the way back up to 1, then increase the FresnelFactor property:
See how the yellow stripe on the engine is less washed out than the previous image, yet the reflection is still visible around the edges of the saucer?
Finding the right balance between EnvironmentMapEffect and FresnelFactor is the key to subtle and realistic reflection effects. Many games will want tweak these settings differently for each model. And many near misses on the freeway have been caused by graphics programmers, stuck in traffic, peering at the surrounding cars to investigate what sort of Fresnel reflection they are using!
Another useful technique is to draw the shape of one or more lights into a cubemap texture, which allows any number of specular lights to be implemented with a single lookup. Unlike reflection images, which are blended with the base texture, specular light should be added to it, so the specular amount needs to be stored separately from the reflection image. EnvironmentMapEffect achieves this by reading specular amount from the alpha channel of its cubemap.
For this demo, I created a specular light image in Paint.NET by setting my brush size nice and big, drawing white dots in random locations, then applying a Gaussian blur:
The custom TexturePlusAlphaProcessor merges this data into the alpha channel of my reflection photo. When the output from TexturePlusAlphaProcessor is fed into the CubemapProcessor, it creates a cubemap with this alpha channel:
To see the specular lighting in isolation, turn EnvironmentMapAmount down to 0, then increase the EnvironmentMapSpecular property:
Here you see specular light from 28 tiny sources, but we could increase this to hundreds or thousands with no performance impact simply by changing our texture. Or we could draw more complex patterns to emulate non-point light sources. And of course we can combine this specular lighting with reflections, Fresnel or otherwise. Many possibilities to explore...